Showing posts with label ScanNCut. Show all posts

Tuesday, October 27, 2020

T Stands for Halloween Card and Mug


I was sending some calligraphy magazines to my friend, Nan, and thought I'd make a Halloween card. I found an easy design on the Brother Canvas Workspace. I added a sticker to the front of the card.


The card was a pop up. Too fun. 

A lot of the T Ladies have been showing Halloween or Autumn mugs/cups in their posts. I was sad and a little jealous because I didn't have a Halloween mug. Then while rummaging in the cupboard for a clean, Christmas mug,(any mug will do as long as it's clean.)I happened to find a blue mug with ghosties! What joy! What rapture!

The Halloween mug belonged to the Eldest. In college, she worked as a customer service rep for a catalog company. One Halloween, her supervisor had a  mug filled with goodies at each rep's station. But now, the mug is mine!

Drop by hosts, Bleubeard and Elizabeth’s blog to find out what the rest of the T gang is up to. If you want to play, include a beverage or beverage container in your post. Don’t forget to link your blog from Bleubeard and Elizabeth’s page.

Thursday, August 27, 2020

Anniversary Card


Using the Scan n Cut machine, I made an anniversary card for The Brother and his Wife. This was a pattern found on the Canvas Workspace. Though I made a couple of changes to the card.


I didn't like the font that was chosen for the "congratulations" sentiment. The machine comes with some predesigned words and phrases under the Logo tab. I chose Celebrate and was easily able to resize the sentiment to fit the card. I also added a few pearl beads and jewels for champagne bubbles along with a tiny heart sticker.

Friday, July 24, 2020

The Friday Five Good Things

Five good things that happened this week.

1.I learned how to make a FCM file from a high resolution jpg or png for the Scan n Cut machine

2. Baked the Starlight Double Delight Chocolate Cake with orange flavoring as requested.

3. Washed the windows and hung new curtains in the bedroom

4. Watched Taras Bulba from the TCM movie Himself recorded for me on the DVR

5. Had awesome leftover lunch a meatball sub from the local pizza/sandwich shop

How was your week?

Thursday, July 23, 2020

Gamer Gift Box and Card


The Young One celebrated her birthday this week.She's a Gamer so when I saw the die shaped box on the Canvas Workspace I knew that would be perfect for her with the dots in her favorite color, red.

I thought a card shaped like a gamer controller would be perfect, and I found a free cut file. It wasn't in the correct file format for the Scan n Cut. What to do?

Fortunately, Julie Fei-Fan Balzer, a paid spokesperson for the Brother Scan n Cut machine, had a tutorial on how to convert  images to the correct  file type  the Scan n Cut uses.


The card needed an inside and a sentiment. So I duplicated the shape and cut out the text Happy Level. The 28 were number stickers I had in my stash and fortunately the Young One's favorite color. 

The Young One was almost as pleased with the gift box and card as she was with the gift. A little thing, but it made me happy, too, after going through the effort.


Monday, July 13, 2020

Purse Shaped Gift Box


The Eldest starts us off with the first birthday this month. Her favorite color is pink and I had enough scraps of pink paper around to make this little purse gift box from the Scan n Cut Canvas Workspace to tuck in a check.

Since she lives so far away and no chance of visiting her this Summer, I made her a cake shaped card like I made my grand-niece. The paper was a fuchsia shade of pink with roses, green accents and you may have guessed I forgot to take a picture of the Eldest's card.

Monday, May 25, 2020

Greeting Cards

I needed to send a few greeting cards and with the stationery stores closed needed to make them myself with the help of the Brother Scan n Cut machine. Each month Brother adds to their Canvas Workspace (online cloud site) free ideas and cut files to use. It's also easy to mix and match items to create custom cards.


This was to be used as a Mother's Day card.  I needed a thank you card so instead of cutting out Happy Mother's Day for the frame, I just wrote out "thank you" instead.


I sent this birthday bouquet to Nan for her birthday, but instead of cutting out the birthday greeting, I wrote it out.


My grand-niece turned 2 years old. This card was perfect as is. A candle for each year and one to grow on.


My tablemate from the Reggie class had sent me a Valentine and I wanted to send her a thank you. I found this interesting wrap card with this lacy outer


and then the inner wrap cut from printed paper


L is fond of sheep and all her artwork has sheep or lambs on it. So I borrowed items from other cards to make this scene for the inner part of the card. The lamb shape was from a bookmark. I cut two. On the second one, I cut off the feet and turned it upside down for the cloud. An Easter card gave me the fence, wavy grass, and flowers. I wrote "thank ewe" in the lambie cloud.


I needed a birthday card for Himself. Scan n Cut comes with built-in text like this Happy Birthday. I didn't need to cut out a card front as I had blank cards that would fit the 


blue, inside pop up. I chose the balloon card to coordinate with a gift bag that had balloons on it. I used the built-in text to cut "love" and used the cut out heart to cover over the blue dot in birthday on the front.

Friday, May 15, 2020

The Friday Five Good Things

Five good things that happened this week.

1.For Mother's Day, Himself gave me a buoy bell windchime, with a black bear on the clapper, grilled Little Princess steaks (filet mignon wrapped in bacon), and baked brownies for dessert.

2. I also Skyped with the Eldest

3. I had fun playing with the Scan n Cut machine (to be seen in future blogposts)

4.  Himself also gave me a weather station as a very, early birthday present

5. With the weather finally warming up, we moved the television into the sun room.

How was your week?

Thursday, April 30, 2020

Morning Glory Card


I wanted to send a Thinking of You card to my cousin so I turned to the Brother Canvas Workspace to find a project using the Scan n Cut 2.

This morning glory card caught my eye. The original project was a rubber stamp project. Apparently, the Scan and Cut can be used to cut material to make your own rubber stamps.

I don't do much rubber stamping and didn't have the materials on hand even if I wanted to give it a try. I cut all the pieces needed for the card using paper I had on hand, some scrapbook paper, and pastepaper I made for the flowers. The only pieces I had to add were the white star shapes of the flowers and the yellow center. The machine comes with some basic shapes so I found a thin armed star and resized it. The yellow centers were punched with a 1/4 in. hand punch.

The shapes were cut and adhered to the card with a glue stick.The flowers are stuck to the card using dimensional tape. The card even had a little, display stand cut from cardstock.

If you want to see the machine in action, you can watch the video below.


Thursday, April 16, 2020

Easter Box

Another project from the Brother Canvas Workspace for the Brother Scan n Cut machine, because you can't make something for the Eldest without making something for the Young One in her favorite color, red.


This time an egg-shaped box to hold a little Easter prezzie. This project just called for patterned paper to make the egg front. I thought it looked boring so from the pattern that I used to make the Eldest card, I cut the bunny, bow, and carrots to dress up the front.

I like how you can borrow bits from the other projects to change things up and make it your own.


From the side, the egg shape covers the box that can hold a little something. The front measures approximate 5 inches tall by 4.5 inches at the widest point of the egg.


Monday, December 17, 2018

Using the Scan N Cut: Snowman Boxes and Gift Tags


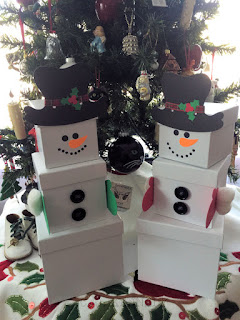
A month or so ago, I saw a grandparents' gift idea. Three, large-ish boxes were wrapped and stacked and made to look like snowmen. The bottom box was to contain a game/toy, the middle box was for clothing, and the head was filled with treats. I liked the idea and thought I could adapt it on a smaller scale for the girlies. I found the 3 different white size boxes at Michael's.

I adapted some projects at the Brother Canvas Workspace for the Scan n Cut machine.

The snowman hat and face came from a gift bag project and the mittens were from a Christmas card project. The cards had to be resized. Cotton balls (cotton wool) were used for the fur trim on the mittens. A ribbon was used for the hat band, and some buttons from the button box to finish off the snowman. Green for The Eldest and red (her favorite color) for the Young One.

Inside, something fun, something practical, and some treats. The three boxes fit neatly into the USPS large, flat-rate shipping box and arrived at the Eldest's mailbox in two days.

I also made a couple of gift tags adapting a gift tag tutorial from Alandacraft.com


 I am loving the Scan N Cut and really enjoying making things.

Monday, November 19, 2018

Cinderella Seating Tags

I had mentioned last month, I was working on seating tags for a Cinderella wedding. The bride had found a skeleton key that was actually a bottle opener. The opener would double as a decoration for the seating tag and as a favor.

Oval tags (2 .5 inches wide x 6 inches long) were cut from Diploma Parchment paper using the Scan n Cut 2 cutting machine. A 1/4 inch hole was also cut from one end of the tag to tie the key to the tag  with a ribbon. The ribbon was narrow, Cinderella blue (of course) and edge with silver because you can't have too much bling for a wedding.


To further incorporate the Cinderella theme, a copyright-free castle design was scanned into the Scan n Cut so 1 inch castles could be cut out of Canson Mixed Media Paper. The castles would have blue glitter applied to them and would be glued to the left side of tag.


I lettered the tags in an Italic hand as chosen by the bride and groom. The Mother of the Bride with a team of minions took care of assembling all the pieces parts.

The Bride and The Young One went to elementary school together. The Mother of the Bride had told me when she came to pick up the tags that when she found out I was a calligrapher, she knew she would have me do her daughter's wedding. Too funny.

I had asked the Mother of the Bride to send a picture of the tags from the wedding. She also texted me a nice note. "BTW, they were so beautiful, I only picked up one left on the table. I think everyone loved them so much, they brought them home. Thank you so much for helping to make The Bride's wedding extra special!!!"

Once my work is out the door, I usually don't hear back. So this was extra special for me, too.