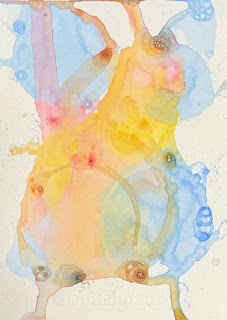
Bubble printing is messing fun. You can use colored inks, tempera paints, acrylic paints, or food coloring. If you are doing this activity with children, I suggest you use food coloring. Just in case they inhale instead of exhale, the solution will taste nasty, but won't kill them.
For all three methods you will need: shallow containers (I used yogurt containers. One for each color), water, dish soap, and your colorant (paint, ink, food coloring) and plastic drinking straws. One for each color. If more than one person is playing, each person gets their own set of straws. Watercolor or Mixed Media paper. You may also want to cover your work surface with newspaper or plastic trash bag.
If you are doing this activity with children, use a pin to punch a hole or two halfway up the straw. Hopefully, this will prevent any liquid getting to the mouth end of the straw if inhaled instead of exhaled. Again, food coloring would work best for the kidlets.
In each cup mix a tablespoon of soap with a couple of tablespoons of color. I didn't measure anything just eyeballed.
Add a half cup of water to each cup. You may need more water, soap, and colors depending how big your containers are.
Gently blow bubbles into the cup. Try not to blow the bubbles too far over the rim. Gently press your paper onto the bubbles. The bubbles will leave an imprint.
Your mileage may vary, but I used acrylic paint and found the color didn't really come up into the foam.
I had to add a lot more color. I suspect the paint was too heavy for the solution.
Many years ago, I had better luck using colored ink or food coloring.
Method 2: Printing with a Single Bubble
If you hold the straw upright in the bubble/paint solution and then put your finger over the top of the straw, capillary action will draw a bit of the solution into the straw. Move your straw over the paper and release you finger. A drop of liquid will fall on the paper. You can also use a cleaned out eye or medicine dropper or pipette. You just need a little drop.
Insert the straw into the drop and blow gently. You should get a bubble.
When the bubble pops, it will leave an impression behind.
Method 3: Star Burst Effect
If you hold the straw upright in the bubble/paint solution and then put your finger over the top of the straw, capillary action will draw a bit of the solution into the straw. Move your straw over the paper and release you finger. A drop of liquid will fall on the paper. You can also use a cleaned out eye or medicine dropper or pipette. You just need a little drop.
This time instead of blowing across the drop, place your straw over the drop. You may need to stand up. Then give a quick puff. The color should scatter in a star burst or fireworks effect.
You can use your creations as collage fodder or as a background.


I'm glad you shared this CJ because I've seen painting with a straw (which didn't work so well when I tried this) but not with soapy bubbles. This looks like fun. And I love your results. Happy Monday!
ReplyDeleteIt is messy fun. I had better luck with colored inks. I think the acrylic paints were too heavy for the bubbles, but your mileage may vary
DeleteThe first time I did this, I used food coloring. https://alteredbooklover.blogspot.com/2009/02/bubble-bubble-background-technique.html
ReplyDeleteI've been playing around with more bubbles and as soon as I find an empty plastic bottle (water, soda, etc.) I have another technique I want to try. Amazing I may be the only person in town who doesn't have a plastic Coke, Pepsi, or Evian bottle to cut.
I had not considered the star burst idea. I like how you captured that effect. Gosh, CJ, I stand to make all my art.
I had the best results with thinner coloring like ink and liquid food coloring. The starburst effect I learned from calligrapher, Peter Thornton. He used walnut ink
DeleteI bet the kids had a blast with this one! (I shudder to think of the cleanup though......LOL)
ReplyDeleteI haven't done this class with children. Not even my own. 😉
DeleteThis is so neat. Thank you for sharing. Regine
ReplyDeletewww.rsrue.blogspot.com
You're welcome
DeleteLovely, this is also something that big, elderly kids enjoy! Valerie
ReplyDeleteYes, we do 😊
DeleteThat is really COOL!!!
ReplyDelete😊
DeleteHi CJ, I am a first time blog visitor who stopped in for a visit from Lady Caer Morganna's blog. I am always looking for new blog friends, especially here in New England. We currently live in Nashua, NH, but are NJ natives. We've driven through your part of MA many times.
ReplyDeleteThis bubble painting like a lot of fun and if only we lived closer to the youngest granddaughter, but alas she is a several hours drive away in PA.
Welcome and thanks for dropping in. I know about the several hours drive to PA. My Eldest used to live in Greenville, PA near the OH border.
DeleteI just noticed that we have another blog friend in common, Bio Art Girl, Erika
ReplyDeleteYes, we share a blog neighbor 😊
DeleteThis is kind of cool. Never heard of this style. I imagine inks would also work good like you said above in the comment. I went and checked your Inktober of 2022. I missed it last year. That is when i was at my sister's house and busy during that time. Nice inktober sketches. i would love to do calligraphy like you. I have a few books but no motivation yet.
ReplyDeleteKeep looking at the books and motivation will come 😊
DeleteGreat art method. - Anne (Cornucopia)
ReplyDelete